Please note that these pages are meant as general instructions. While most of the information here applies to all scanners, some options may not be available on certain scanner models. Model-specific options are indicated in the text.
This section deals with EDACS Wide or standard systems.
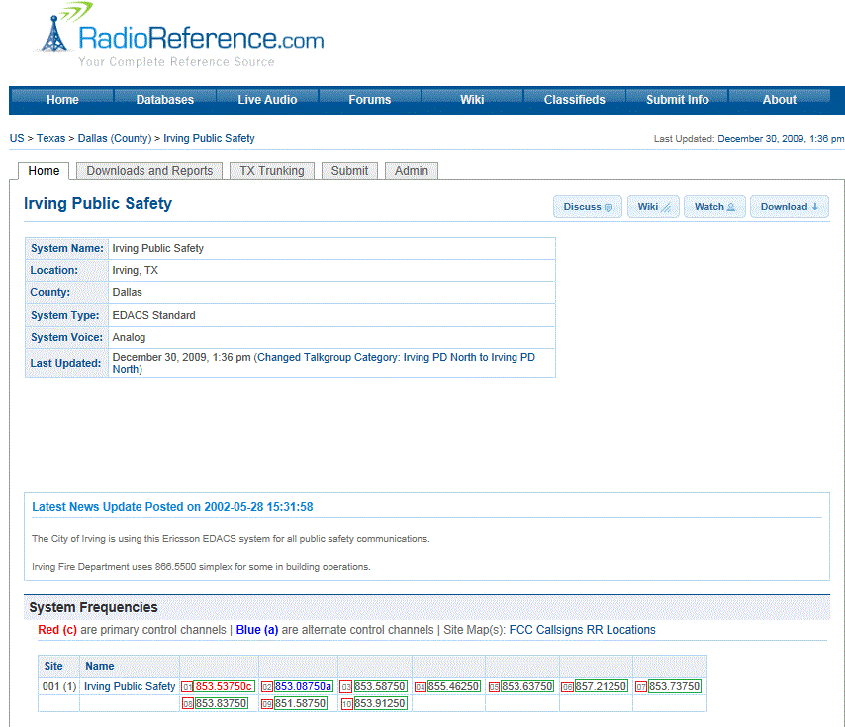
Click here for information on EDACS SCAT systems. This includes EDACS systems that use ESK. No special setting is needed to enable ESK tracking on an EDACS system. Note that the scanner cannot decode EDACS ProVoice. Below is an example of an EDACS trunked system from
RadioReference:

EDACS Wide System
Programming an EDACS System
To program an EDACS system, you'll need to program the required elements in following order (
click here for information on using the menu):
Create a system
- Go to the Program System menu and choose New System .
- The scanner will prompt you for the System Type. Select EDCS .
- The scanner will prompt you for the sub-type. Select Wide/Narrow .
- When the scanner prompts you confirm, tap YES .
- The scanner creates the system with a default name. Select Edit Name if you want to change it.
- If you need to change any of the system properties, you can do that now. Unless a property is Required , you can operate the system without changing the default settings.
System properties
All of these options can be found under your scanner's
Program System menu. If necessary, the sub-menu and option name on each scanner are listed beside the property.
Create at least 1 site
Each EDACS system can contain up to 256 sites, and all systems must contain at least 1 site.
- On the Program System menu, select the system you just created.
- Go to the Edit Site menu and select New Site .
- If you need to change any of the site properties, you can do that now. Unless a property is Required , you can operate the system without changing the default settings.
Site properties
All of these options can be found under your scanner's
Edit Site menu. If necessary, the sub-menu and option name on each scanner are listed beside the property.
Create at least 1 frequency in each site
Each trunked system can contain up to 30 frequencies in each site, and all sites must contain at least 1 frequency.
- On the Edit Site menu, select the site you just created.
- Go to the Set Frequencies sub-menu and select New Frequency .
- Enter all frequencies for this site. (Note: Enter any numbers outlined in GREEN. See example image above.)
- When you enter a new frequency, the scanner will prompt you for the logical channel number or LCN for that frequency. Enter a number from 1 through 30. (Note: Enter the number outlined in RED that's located before the number outlined in GREEN. See example image above.)
- If you need to change any of the frequency properties, you can do that now. Unless a property is Required , you can operate the system without changing the default settings.
Frequency properties
All of these options can be found by selecting the frequency under the
Set Frequencies sub-menu. If necessary, the sub-menu and option name on each scanner are listed beside the property.
Programming a system for Scanning
Once you create the system and at least 1 site, you can
Search the system with no problems. However, if you want to
Scan the system, you'll need to program the required elements in following order (
click here for information on using the menu):
Create at least 1 channel group
Each EDACS system can contain up to 20 channel groups, and any system you want to scan must contain at least 1 channel group.
- On the Program System menu, select the system you just created.
- Go to the Edit Group menu and select New Group .
- If you need to change any of the channel group properties, you can do that now. Unless a property is Required , you can operate the system without changing the default settings.
Channel group properties
All of these options can be found by selecting the group name under your scanner's
Edit Group menu. If necessary, the sub-menu and option name on each scanner are listed beside the property.
Create at least 1 channel in each group
Each trunked system can contain up to 500 channels.
- On the Edit Group menu, select the channel group you just created.
- Go to the Edit Channel menu and select New Channel .
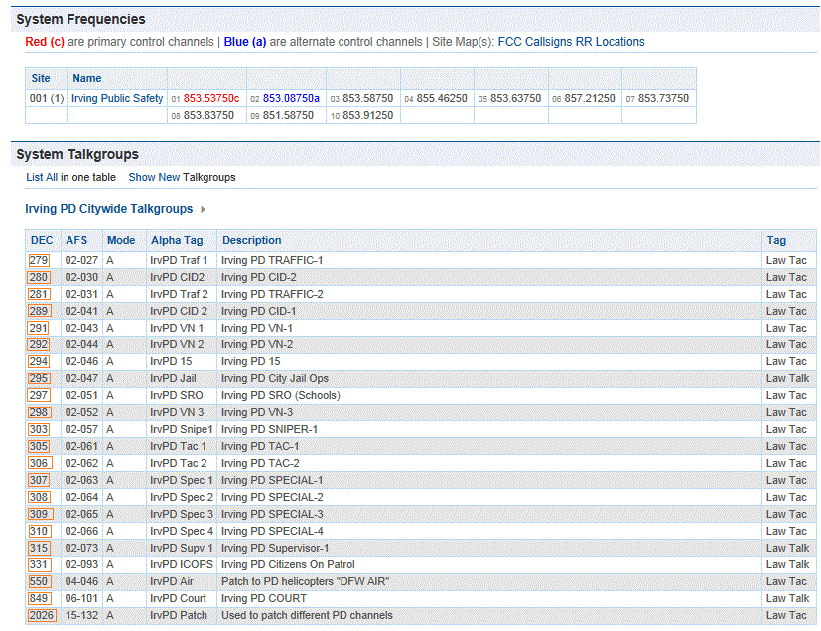
- Input the Talk Group ID (TGID) for this channel. (Note: You will enter the required DEC numbers (outlined in ORANGE) that apply to the agencies that you wish to monitor. See example image below.)
- If you need to change any of the channel properties, you can do that now. Unless a property is Required , you can operate the system without changing the default settings.

EDACS Wide System
Channel properties
All of these options can be found by selecting the channel name your scanner's
Edit Channel menu. If necessary, the sub-menu and option name on each scanner are listed beside the property.


